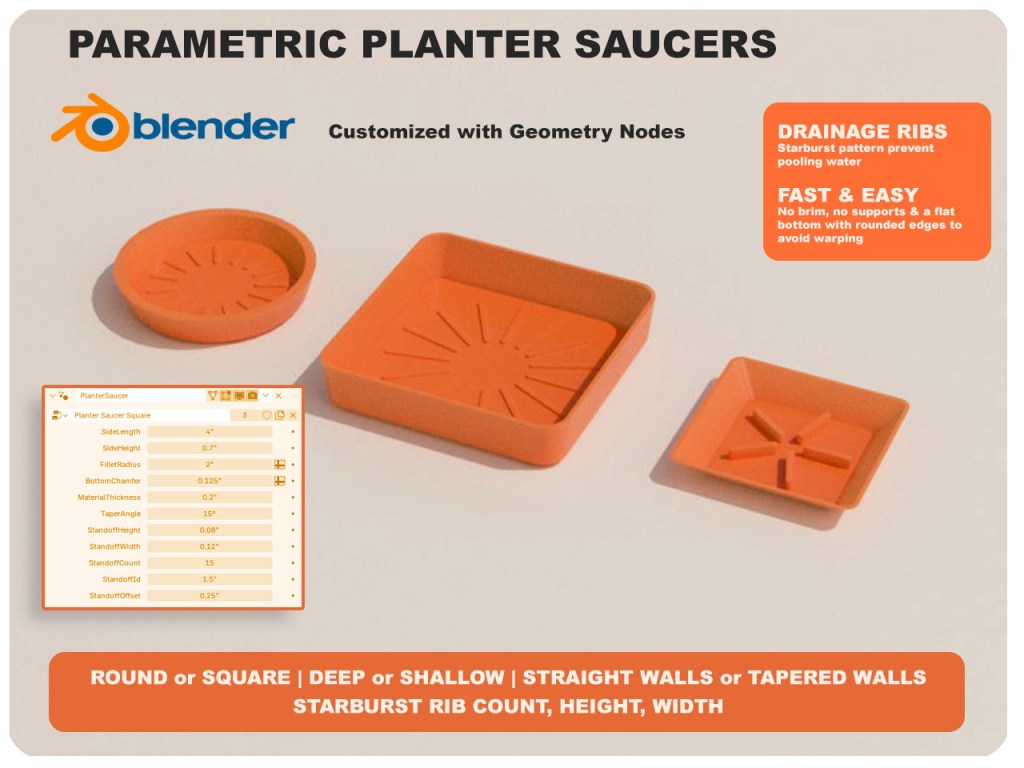
Imperial/Metric Diameter Gauge

A while back, I purchased a GAGE-IT from Home Depot. It’s a handy little tool made from a thin sheet of durable plastic, designed to quickly measure drill bits, bolts, and wire diameters. The tool features a tapered slot with clearly marked imperial and metric measurements along the edge. To use it, you simply slide a round object into the slot until it fits snugly—where it stops corresponds to its diameter. It’s compact, inexpensive, and convenient for quick checks in the shop.

The tapered slot works great for measuring drill bits and wire. However, it doesn’t work well for screws. Because the plastic is so thin, it slips into the threads instead of measuring the screw’s outside (major) diameter. That makes it difficult to get an accurate reading.

I liked the simplicity of the tapered-slot concept, so I designed a new version that also works with screws. My version is 0.2″ thick—substantially thicker than the original—which prevents the gauge from slipping between the threads. This allows it to measure the true outside diameter of screws, bolts, drill bits, and other round stock more accurately.

I modeled the tool and printed it on a 3D printer, making it easy to reproduce or modify. The design is available on Printables here:

If you’ve ever been frustrated trying to quickly identify a screw size, this thicker tapered gauge might be a useful addition to your toolbox.

New Destination for 3D Models

I started posting to Prusa’s Printables. You can trade in reward points for filament, Prusa merchandise or voucher’s for a new 3d printer. If you are very popular, I suppose it is possible to accumulate enough points to earn a new 3D printer.

I currently have 12 models posted and have 130 reward points. A roll of filament is 350 points. A Prusa mini is 10,000 points and a Prusa MK4S is 25,000 points.

I am 0.5% of the way to a MK4S. Every journey starts with a first step.

I plan on using this site to post my models that are designed to be 3d printed. Models that are for rendering will still be posted to CGTrader.

Restoring Solidworks Thumbnails.

During a Windows or Solidworks update, my system lost the ability to show me an icon preview of my Solidworks files. This makes it difficult to find parts and drawings, so I spent some time finding the solution.

Many responses to other Solidwork users experiencing the same problem steered people to folder options check boxes. This didn’t work for me. What I needed was to re-register certain DLL files with the Windows registry.

  1. Load the command prompt window with Administrator rights
  2. Type in these commands:

    regsvr32 “C:\Program Files\Common Files\SOLIDWORKS shared\swdocumentmgr.dll”

    regsvr32 “C:\Program Files\Common Files\SOLIDWORKS shared\sldwinshellextu.dll”

    regsvr32 “C:\Program Files\Common Files\SOLIDWORKS shared\sldthumbnailprovider.dll”

I found a near-solution at GoEngineer, but I had to tweak their instructions a bit because the sldthumbnailprovider.dll file was in a different folder.

(This was the fix for Solidworks 2024 on Windows 11)

Blender Quick Tip: Why my results differ from the tutorial

When following a Blender tutorial, it can be frustrating when the results don’t match what the instructor is showing, despite typing in the exact values. The key to resolving this issue may be checking your units. Most tutorials are created using meters as the unit of measure, but your Blender custom start up may be set to inches or another unit. This discrepancy has tripped me up when working with procedural shaders and geometry nodes.

So the next time you are watching a tutorial, pay attention to the units. This simple step will save you time and frustration, helping you to replicate the tutorial accurately and continue learning effectively.

Thingiverse: Diamond Cutter Box

I purchased a set of diamond wheels from Harbor Freight. Spent less than $10. In order to protect my investment, I 3D printed a box to hold the arbor and wheels.

The first iteration held the arbor but I didn’t make a slot at the end of the arbor. This oversight means I would have had to disassemble the wheel from the arbor to put it away. I know me, and I know that means eventually this would keep me from putting the pieces back in the box. I reprinted the box for the final design and released it to Thingiverse this morning.

Link to Thingiverse: https://www.thingiverse.com/thing:6476550

The design was created in Blender and processed for printing with the Prusa Slicer.