Blender Tip: Reveal text from left to right
Animate text appearing left to right in Blender with a material node tree: generated coordinates, a Less Than node, two keyframes and the EEVEE alpha setting.
A “Build” modifier can be used when animating text in the Blender 3D viewport, but it has the drawback of “building” the text from right to left. I prefer the text to be revealed from left to right.
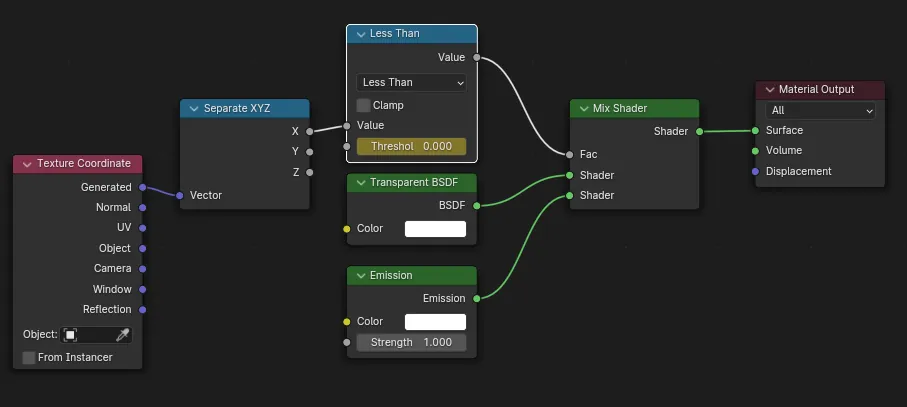
One way to accomplish this is with a material node tree.
If you read the node tree from right to left, you see that a mix shader shows either an emission or is completely transparent. The emission/transparent factor is controlled by the coordinate nodes on the left. Use the “Generated” texture coordinate node. This is preferable to the “Object” texture coordinates because the scale of the object does not affect the value in the “Less Than” math node.
Set two key frames for the “Less Than” threshold. At the start of the reveal, the threshold is 0.000. At the end of the reveal, the threshold is 1.000.
If the text you are revealing is not on the XY plane, you may need to add a Mapping node to rotate the coordinate system.
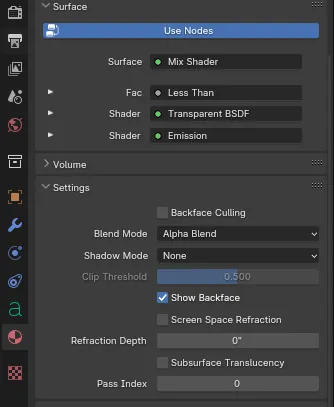
NOTE: If you are using the EEVEE render engine, go to the material tab and change the Blend Mode from Opaque (the default) to Alpha Blend in the Settings group.
Update 9/23/2026: Blender 4.2 replaced EEVEE with a rewritten version, and the Blend Mode setting above is gone. Its place in the Settings group of the material tab is taken by Render Method, which has two choices: Dithered (the default) and Blended. In Blender 4.2 and later you do not need to change anything. The default Dithered setting renders the transparent half of the mix shader as fully transparent, so the text reveals left to right as written. Blended also works if you prefer it. The Alpha Blend step only applies to Blender 4.1 and earlier.