Blender Tip: Straight or Curved Node Links
Make Blender's shader node links straight or curvier: Edit › Preferences › Themes › Node Editor › Noodle Curving. Zero is straight, ten is curviest.
By default, links in the Blender shader editor are gently curved, but did you know that you can make them straight lines or curve them even more like a noodle? This can help you create a more visually appealing and organized shader network, making it easier to see the relationships between nodes.
Here’s a quick tip on how to change the shader links in Blender to be either straight or curved:
Step 1: Go to the User Preferences
In the top bar, go to the Edit menu and select User Preferences. This will open the User Preferences panel.
Step 2: Open the Themes tab
In the User Preferences panel, go to the Themes tab. This tab allows you to change various appearance settings for Blender, including the appearance of links in the shader editor.
Step 3: Change the Link Style
In the Themes tab, look for the Node Editor section. Scroll to the bottom of this section and find the “Noodle Curving” value. Set the value to zero for straight lines. For curved noodles, increase the value from 1 to 10 where 10 is the “curviest”.
Step 4: Save your Changes
Once you’ve made your changes, make sure to save them by clicking on the “Save User Settings” button.
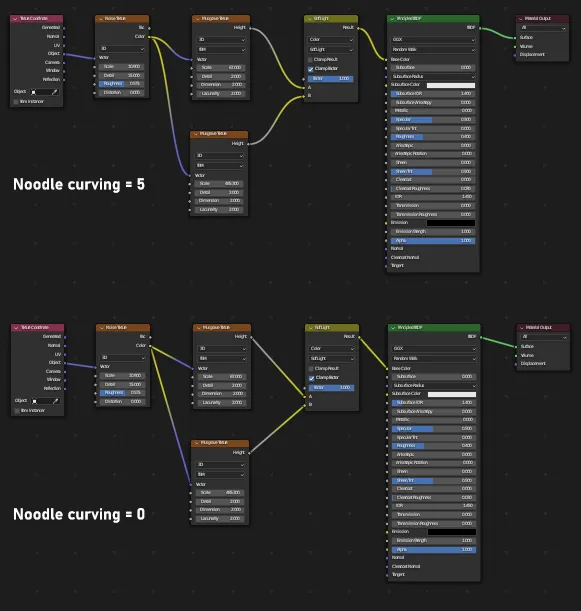
And that’s it! Your shader links should now be either straight or curved, depending on the setting you chose in the User Preferences.
By changing the appearance of the links in the shader editor, you can create a more visually appealing and organized shader network, making it easier to see the relationships between nodes and to troubleshoot any issues that may arise. So try out this quick tip and see how it can improve your workflow in Blender!
Note: This tip was written for Blender version 3.4.
Bonus tip:
Hold Control, press the right mouse button and drag across a noodle to cut it. This is built into Blender, so you don’t need Node Wrangler.
Update 9/23/2026: The menu names in the steps above come from Blender 2.7x. Since Blender 2.80, User Preferences is called Preferences, so go to Edit › Preferences, then Themes › Node Editor to find Noodle Curving. Preferences now save automatically when you change them. If auto-save is turned off, open the menu at the bottom left of the Preferences window and choose Save Preferences. There is no Save User Settings button anymore. Checked in Blender 4.5.